
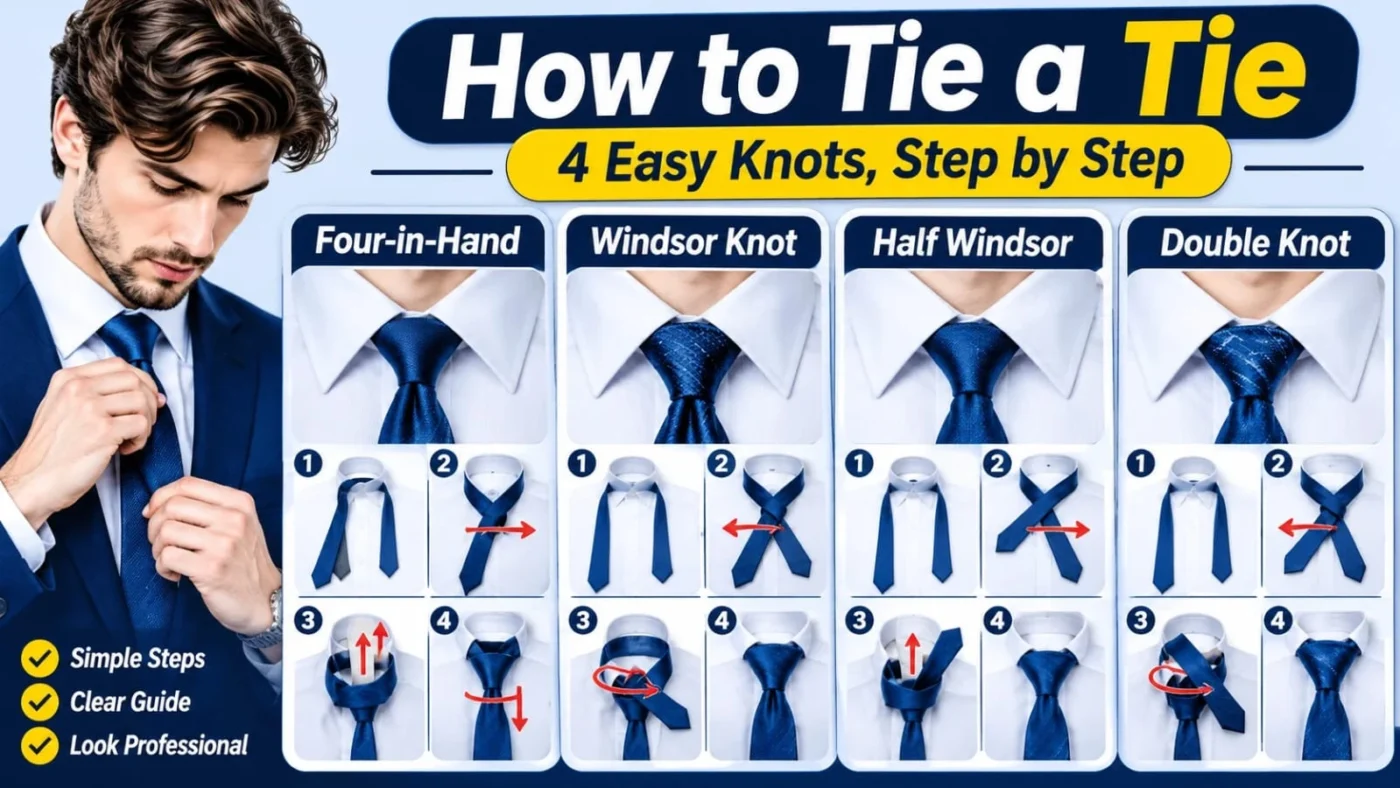
How to Tie a Tie: 4 Easy Knots, Step by Step
To tie a tie, drape it around your collar with the wide end on your right, about 12 inches lower than the narrow end. Cross the wide end over, wrap it around, pass it up through the neck loop and down through the front loop, then slide the knot snug. The four-in-hand is the easiest knot for beginners.
Learning how to tie a tie takes four knots and a mirror. Below you will find clear steps for the four-in-hand, half Windsor, full Windsor and Pratt knots, plus tables that match each knot to your collar, show where the tip should land, and fix the usual mistakes.
How to Tie a Tie: Set Up Before You Start
Start with the collar up, the tie flat around your neck, the wide end on your right and about 12 inches below the narrow end. Every knot in this guide builds on that position.
A tie knot is the wrapped, folded loop that sits at your collar once you pass the wide end around the narrow end and through the neck loop. The wide end is the broad tail you see in front, the narrow end is the thin tail behind it, and the neck loop is the band of fabric that circles your collar. In every step below, left and right mean your own left and right.
Get Your Collar and Tie Ready
Button the shirt to the top, raise the collar, and drape the tie so the seam on the back faces your body, unless a knot says otherwise. Smooth out any twists before you begin, because a twist in the fabric always shows in the finished knot.
Set the Starting Length
Where you start decides where the tip ends. Treat 12 inches as a first attempt, not a rule: if the wide end finishes above your belt, start lower next time, and if it finishes below, start higher. Bigger knots use more tie.
Four-in-Hand Knot: The Easiest Place to Start
The four-in-hand is a slim, slightly asymmetrical knot with the fewest moves, which is why most people learn it first. It suits narrow collars, button-down shirts and heavier tie fabrics, and it leaves plenty of tie length for tall wearers.
Four-in-Hand Steps
- Drape the tie with the wide end on your right, about 12 inches below the narrow end.
- Cross the wide end over the narrow end to form an X under your chin.
- Wrap the wide end behind the narrow end and bring it back out on your right.
- Cross the wide end over the front again, from right to left, forming a horizontal band.
- Bring the wide end up through the neck loop from underneath.
- Hold the front of the knot loosely with a finger and pass the wide end down through the band you made in step 4.
- Hold the narrow end, slide the knot up to the collar, and centre it.
Half Windsor Knot: A Balanced Knot for Business
The half Windsor is a neat, symmetrical triangle, larger than the four-in-hand and smaller than the full Windsor. It suits standard and medium-spread collars and light to medium tie fabrics.
Half Windsor Steps
- Drape the tie with the wide end on your right, about 12 inches below the narrow end.
- Cross the wide end over the narrow end.
- Bring the wide end underneath the narrow end, back toward your right.
- Bring the wide end up and through the neck loop, then pull it down on your left.
- Bring the wide end across the front of the knot, from left to right.
- Bring the wide end up through the neck loop again.
- Pass the wide end down through the front loop you just created.
- Tighten gently, slide the knot up to the collar, and centre it.
Full Windsor Knot: The Formal Choice
The full Windsor is a wide, symmetrical triangle made by wrapping the tie around the knot an extra time. It fills a wide spread collar and suits formal occasions, but it uses the most tie length, so check where your tip lands before you tighten.
Full Windsor Steps
- Drape the tie with the wide end on your right, about 12 inches below the narrow end.
- Cross the wide end over the narrow end.
- Bring the wide end up through the neck loop and pull it down on your left.
- Wrap the wide end behind the narrow end and out to your right.
- Bring the wide end up through the neck loop again and pull it down on your right.
- Cross the wide end over the front of the knot, from right to left.
- Bring the wide end up through the neck loop one last time.
- Pass the wide end down through the front loop, then tighten and slide the knot up to the collar.
Pratt Knot: Compact and Symmetrical
The Pratt, also called the Shelby, is a medium-sized, symmetrical knot tied with the tie turned inside out. It suits most dress shirts and uses less length than a Windsor, so it is useful when your tie runs short.
Pratt Steps
- Turn the tie so the seam faces outward, with the wide end on your right and a little lower than the narrow end.
- Cross the wide end under the narrow end.
- Bring the wide end up through the neck loop and pull it down in front.
- Cross the wide end horizontally over the front of the knot, from right to left.
- Bring the wide end up through the neck loop again.
- Pass the wide end down through the front loop, then tighten and centre the knot.
Which Knot for Which Collar
Match the size of the knot to the gap between your collar points: narrow gaps take the four-in-hand, medium gaps take the half Windsor or Pratt, and wide gaps take the full Windsor. A medium spread collar is the most forgiving and works with all four.
| Knot | Shape | Best collar | Best tie fabric | Formality | Tie length used |
|---|---|---|---|---|---|
| Four-in-hand | Small, slightly asymmetrical | Narrow spread, button-down | Heavier fabrics such as wool or knit | Everyday to business | Low |
| Half Windsor | Medium, symmetrical triangle | Standard to medium spread | Light to medium weight | Business | Medium |
| Full Windsor | Large, symmetrical triangle | Wide spread | Light to medium weight | Formal | High |
| Pratt (Shelby) | Medium, symmetrical | Medium spread, most dress shirts | Light to medium weight | Business to semi-formal | Low to medium |
Match Your Tie Width to Your Jacket
Pick a tie width that echoes your jacket lapels, because a knot only looks right when the blade below it is in proportion. According to published tie widths, a standard tie measures roughly 3.25 to 3.5 inches, a skinny tie 1.5 to 2.5 inches, and many designers sit in between at 2.75 to 3 inches.
How Long Should a Tie Hang
The tip of the wide end should reach the top of your belt buckle or waistband, and the narrow end should sit hidden behind it. If it lands anywhere else, change your starting position, not the knot technique.
| Where the tip lands | What it means | What to change |
|---|---|---|
| Above the belt buckle | Too little tie left for this knot | Start with the wide end lower, or switch to a smaller knot |
| At the top of the belt buckle | Correct length | Keep this starting position for next time |
| Below the belt buckle | Too much tie left | Start with the wide end higher, or use a larger knot |
| Narrow end hangs below the wide end | Narrow end started too long | Start with the narrow end higher, or tuck it into the keeper loop |
Tall wearers and anyone with a larger neck should lean toward the four-in-hand, half Windsor or Pratt, because the full Windsor can leave a standard tie too short. The keeper loop, a small fabric loop sewn on the back of the wide end, holds the narrow end in place so it never peeks out.
Fix Common Tie-Tying Problems
Most bad knots come from three things: a wrong starting length, a twisted tie, or a knot tightened before the wraps were centred. Each one has a quick fix.
| Problem | Likely cause | Fix |
|---|---|---|
| Knot looks loose or sloppy | Tightened before the wraps lay flat | Hold the knot with one hand, pull the narrow end down with the other, then slide the knot up |
| Knot is lopsided | Uneven wraps or a twisted tie | Untie, lay the tie flat, and repeat the wraps in the same direction |
| Knot is too big for the collar | Knot size too large for the collar gap or the tie is thick | Switch to a four-in-hand or half Windsor |
| Wide end will not pass through the front loop | Front loop pulled too tight | Slip a finger into the loop to hold it open before feeding the wide end through |
| Collar gap shows under the knot | Knot not slid all the way up | Hold the narrow end and slide the knot up to the top button |
Add a Dimple and Store Your Tie
A dimple is the small fold just below the knot that gives it shape. Make it by pinching the tie as you tighten, and protect the tie afterward by untying it in reverse.
How to Make a Dimple
Before the final tightening, pinch the wide end between your thumb and forefinger just below the knot. Keep the pinch in place while you slide the knot up to the collar, then release gently.
Untie and Store Your Tie
Undo the steps in reverse rather than yanking the wide end back through, since pulling hard creases the fabric. Guidance on untying after wear says a tie untied the same way it was tied lasts longer. Then hang it or roll it loosely. Small habits like this are the kind of practical advice you can find across our Home & Everyday Life articles.
Beyond the Basics: How Many Knots Exist
Mathematically there are exactly 85 ways to tie a tie using the conventional wrapping method, and four of them cover almost every real situation. In their book on the subject, Thomas Fink and Yong Mao showed that, for a typical tie and wearer, 85 is the full count, while common reference guides list the four basic knots as the four-in-hand, half Windsor, Windsor and Pratt.
For more everyday how-to guides, browse our Lifestyle & Self-Improvement section or the full Gotpedia blog.
Frequently Asked Questions
What is the easiest tie knot?
The four-in-hand is the easiest tie knot. It needs only a handful of moves, produces a slim knot, and forgives small mistakes. Most beginners learn it first, and it works with everyday work shirts, button-down collars and heavier tie fabrics.
How long should a tie hang?
A tie should hang so the tip of the wide end reaches the top of your belt buckle or waistband. The narrow end should stay behind it and never fall lower. If the tip lands elsewhere, adjust the starting position of the wide end rather than the knot.
Which tie knot is best for a wedding or job interview?
For a job interview, the half Windsor or four-in-hand looks neat and professional. For a wedding or other formal event, the full Windsor suits a wide spread collar. Choose the knot that fits your collar first, then the occasion, so the knot sits cleanly between the collar points.
What is the difference between a half Windsor and a full Windsor?
A half Windsor wraps the wide end around the knot once, giving a medium triangle. A full Windsor wraps it twice, giving a larger, wider triangle. The full Windsor looks more formal and fills wide spread collars, but it uses noticeably more tie length.
How do you tie a tie if you are tall or have a large neck?
Choose a knot that uses less tie, such as the four-in-hand, half Windsor or Pratt, and avoid the full Windsor with a standard-length tie. Check where the tip lands before tightening, and consider an extra-long tie if it still finishes too high.
How do you fix a tie that comes out too short?
Untie it and start again with the wide end hanging lower than before. If it is still short, switch to a smaller knot, because the full Windsor uses the most length. The four-in-hand and Pratt leave more of the tie free below the knot.
How many ways are there to tie a tie?
There are 85 ways to tie a tie using the conventional wrapping method, according to the mathematical analysis by Thomas Fink and Yong Mao. In everyday life, four knots cover nearly every occasion: the four-in-hand, half Windsor, full Windsor and Pratt.
How do you tie a tie on someone else?
Tie it on yourself first, loosen the knot, slip it over your head and place it on the other person before tightening. If you tie it on them directly, stand behind them so your hands move as they would on your own neck, and follow the same steps.
Sources and Methodology
- Thomas Fink and Yong Mao, The 85 Ways to Tie a Tie: https://en.wikipedia.org/wiki/The_85_Ways_to_Tie_a_Tie
- How To Tie A Tie, The Knots (Wikibooks): https://en.wikibooks.org/wiki/How_To_Tie_A_Tie/The_Knots
- How To Tie A Tie, General Tips (Wikibooks): https://en.wikibooks.org/wiki/How_To_Tie_A_Tie/General_Tips
- How to tie a tie: three essential styles and when to use them (T3): https://www.t3.com/au/features/how-to-tie-a-tie
We compared step-by-step instructions from several published guides and reconciled them into one consistent order, written from the wearer’s own left and right. Every figure comes from the sources above. Guidance on starting length and tip position reflects widely shared convention, so adjust it to your own height, neck and tie.